Table of Content
Take a gumball piece of white fondant, place in a small bowl, add approx 3 Tbs of water to the bowl. Heat in a microwave for 5-10 secs, remove and stir. Continue this until the fondant is melted. This will act as the glue to stick all the pieces to the cake.
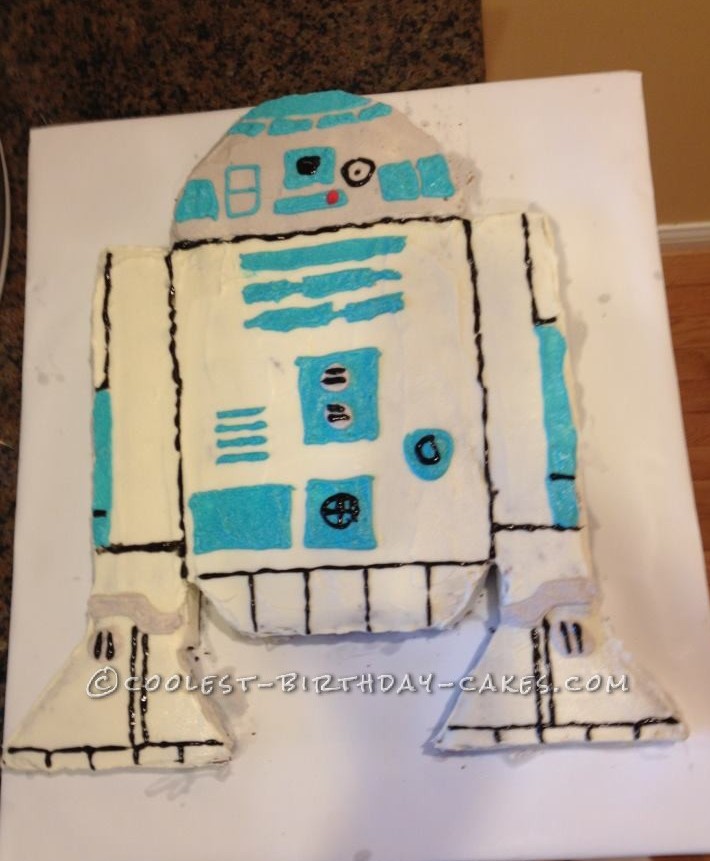
Using a very sharp knife, cut out your R2D2 using the pattern. I am not super amazing talented and the thought of cutting this out without a pattern makes my chest tight with stress. Start with the top as that is the easiest part. Start with the centre and this will allow you to evenly space the other pieces on top of the cake.
Kara's Party Ideas Star Wars Birthday Party | Kara's Party Ideas
When the treats are formed it is time to roll out the remaining white fondant and cover them. You don't have to trim them, just fold the fondant on the back side as it will be hidden when you place the legs on the cake. Use the remaining fondant glue to adhere the legs.

Using an X-Acto knife to ensure clean lines, start cutting all the separate pieces. Take each piece as you cut it and place it on a cookie pan and cover it with plastic wrap to prevent the pieces from drying out. A Death Star cake can be created by baking a cake in a Wilton Ball Cake Pan. Once the cake is cooled and the ball shape is formed, cover the entire cake in buttercream. Take your favourite cake layers and then start to layer buttercream. If you are afraid they might slide then feel free to dowel the cake or even use long straws to hold them together.
Stormtrooper Cake
User a thin layer of buttercream and place the dome on top. Apply a thin layer of buttercream and coat the entire cake. Place this in the fridge and let it set so it is easier to to put the fondant on top. Turns out I wasn’t the only one amazed by this creation. The post drew the attention of BoingBoing, Gizmodo, Elite Choice, and many others. While I loved the traffic, I was even happier that Mark and his wife Leslie, who both run the bakery, got so much exposure.
Right where the round cake meets the straight sides paint a ring around the cake. This forms the head and R2's great looking dome!!! Continue painting until his head is completely covered. You may have to do a couple of coats to make sure its really silver. Roll out the black fondant and navy blue.
Step 4: Putting R2 Together!!
They even backlit the lightsaber by placing glow sticks behind it so that when the lights went out, the saber glowed! The finished lightsaber is then placed on a cake covered in fondant or buttercream and accented with personalized edible cake images. Placing the outline on top of the cake, I used just a normal butter knife to cut around the R2D2 outline.

While the cake was in the fridge, I mixed up the different colors of blue I would need in the decorating process. For this step I used one container of white frosting. I started by mixing a light blue then scooped out around half of the now light blue and added more dye to make it more of a medium blue.
I’m such a rookie and mine turned into a yellowish mess instead of the brilliant white shown here. I am very limited with what chocolate I can get because of his nut allergy. The lightsaber cake image pictured here was provided courtesy of You, On a Cookie. This design is currently their most popular cake. A mold-making kit was purchased to help them create the shape.
Start at the point just under the "eye" and start adding the pieces from the top down to help keep the front aligned. Pick which side you want to be the front and then it is time to start the detail. Set up the front of what you would call the eye. This will align the centre and then you can use this and the silver line to set up the spacing of the top of the cake. Cover the entire cake ball in fondant and using a sharp edge/knife make indents in the cake to form the squares.
Following this process, I then put on a base layer of frosting onto the cake. This is just a simple layer of white frosting to help prevent as much crumbling while decorating as possible. I always was so frustrated with frosting as I would get cake crumbs everywhere. By doing a base coat of frosting and then putting it in the fridge for a while I have had less problems with cake crumbs.
Once the cake is cut, arrange the pieces alongside each other to create the lightsaber. The cake is then frosted or covered in fondant. The lightsaber handle can be frosted or covered with a different colored fondant. You can add more details to the handle if you chose to.


No comments:
Post a Comment